 |
 |
|
|
|
Choosing the wood
|
|
Icon boards can be made from all kind of wood but it must be very dry and free of knots. The icon painter's favorite wood is the linden because it is very homogeneous, soft, and easy to work. The fir tree and the pine, usually used in the Eastern European countries, have a poor reputation because of the pitch they contain, but if they are quite dry and clean of resin, they can be used. The oak and the chestnut, even very dry, tend to split because of the dominant grain of the wood. They are best used for the small icons (less than 30 centimeters).
The wood sold today by industry is often not completely dry. It should be allowed to dry outside for two or three years under a shelter to protect it from the elements.
Because of the lack of proper technology, the Middle Ages could not produce plywood. It is however obvious that this wood would have been employed for the fabrication of the large icons because of its stability, solidity and homogeneity. Marine plywood is, however, unusable because it is impermeable and the preparatory layers will not adhere to it.
The use of laminated wood is not advised because it can often contains hollow spots between the layers under the surface piece that may break down with time. Pressed boards should also be avoided because this aggregate of sawdust, chips and glue can break down quickly especially in damp climates. .
|
|
The board
|
|
If the board is slightly convex, it is appropriate to choose this side to paint on. If there is not a convey side, the best cut of wood to use is that from the heart of the tree as indicated by the growth lines, as illustrated below.
Wood with pits, dips or other deformities on the surface should not be used as it makes application of paint, such as "puddling", impossible.
|
|
|
|
Calculating the size
|
|
Before cutting a board, it is necessary to calculate its exact proportions according to the chosen size of the icon. .
|
 |
The proportions are always calculated for the interior frame of the icon, for example:
- 3 X 4 for half-lenght figures (see opposite)
- 4 X 6 for the Mother of God of Vladimir
- 1 X 3 for full standing figures
- 4 X 5 for the Trinity of Roublev...
The width of the outer frame must be added to the inner dimensions of the icon before cutting the board. These frame strips can be of various types :
- 4 strips of equal width.
- 3 equal strips and a wider bottom strip.
- 2 vertical strips of equal size and 2 broader horizontal strips of equal size. .
|
Once the board is cut, the two most common techniques for preparing the outer frame are :
|
The carved board
|
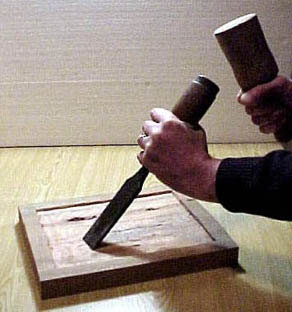 |
Generally boards are carved 2 to 5 mm thick or more, if one desired. This work can be done using a gouge and a large mallet or an electric router.
Make the bottom surface smooth or clean with strokes of a scraper.
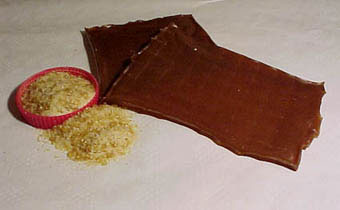
If small knots appear on the surface, it is necessary to hollow them out with a gouge and to fill the holes with a wood paste. This paste can be made by mixing fine sawdust and the woodworking glue. Better yet, avoid using any wood that has knots on the surface upon which you will paint.
|
| A pear tree board of 25 mm thickness and of 3 mm depth. |
|
 |
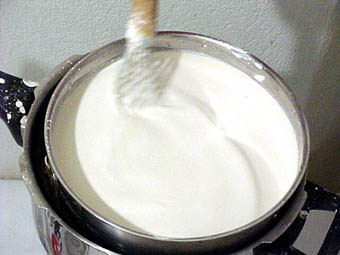
The following day, heat the glue in a double boiler, while stirring with a wire whip, and heat until the first bubbles form around the outer edge of the pan.
The glue has to be very hot and should be thoroughly stirred before application to eliminate any lumps. If you wish to use the glue later, heat it in a double boiler. Do not boil as glue that becomes to hot will loose its ability to bind.
This preparation is used for :
- The wooden framing strips.
- The first layer over the whole board.
- Mounting the linen on the board.
The glue can be preserved for several weeks in the refrigerator.
|
Gluing the board
|
 |
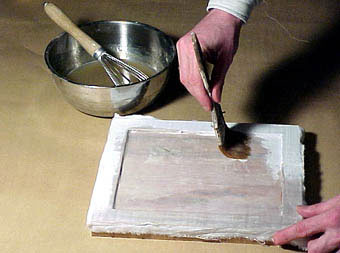
When the glue is quite hot, take it off the heat and spread it evenly and thinly over the entire surface of the board using a large flat brush. Spread glue on both sides to protect it from mold. Wash the brush and wire with hot water and let the board dry overnight. |
Mounting the linen on the board
|
|
This process consists of attaching linen cloth to the board in order to have solidarity between the cloth and the wood. This provides a surface that is flexible and helps to eliminate cracking in the gesso.
If you use plywood this is unnecessary as a good quality of plywood is very stable and does not warp.
|
 |
- Cut a piece of linen that is a little larger than the size of the board. Old cotton cloth also works well. Don't use linens that is too thick or has too tight a weave as they can react unevenly to the moisture and may cause cracks.
- Coat the board with glue, wait until it is absorbed and push the linen out from the center thus driving out any air bubbles. You can use also a wooden block along the edges to ensure that the linen sticks well.
- Be careful that the glue does not go through the linen. You want to be able to locate any air bubble after the surface dries. It is not necessary to cover the edges of the board with linen. |
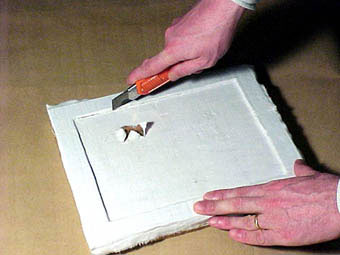 |
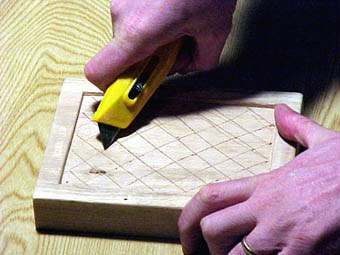
After drying overnight, examine the board carefully by firmly rubbing it with your hand. If the linen fibers move under this pressure, the presence of air bubbles is indicated... Make a notch in a cross over the bubbles, lift the linen and inject a small amount of glue. Then, using an "exacto" knife, score all around the outer circumference of the interior frame. This releases the tension between the edge and the board and prevents cracking |
 |
Put another layer of glue over the entire of the linen especially along the beveled inner edge. Let it dry overnight. |
 |
When the glue is dry, cut off any excess linen beyond the outer edges of the board with a knife.
If you want to preserve the appearance of the wood on the sides, cover them with adhesive tape.
|
|
Proportions for 5 to 6 boards at 20 X 25 cm. |
|
The Levkas, Gesso
|
The word levkas comes from the Greek " leukos " which means white. It is the name given to the fine alabaster powder, or chalk, that is mixed with glue and applied to the board. When painted on, colors can be shown in their best transparent quality.
|
 |
Add 80 grams of hide glue to one liter of water. It will to gelatinous substance overnight.
The following day, heat the glue in a double boiler and gradually incorporate into it a kilo of alabaster powder or French chalk. Continue adding the chalk while stirring forcefully with a wire whip.
|
 |
After all the chalk is incorporated, continue stirring until all the lumps are gone and steam appears. Add five or six drops of linseed oil to the mixture. This will give a good flexibility to the levkas.
Remove from the heat and continue mixing for a few minutes. Never boil the levkas, It is better to prepare this in a container that is very deep as this will prevent too much moisture evaporating. Do not remove the skin that formss on top of the levkas as it will dissolve itself as it is mixed.
|
The first four layers of levkas
|
|
 |
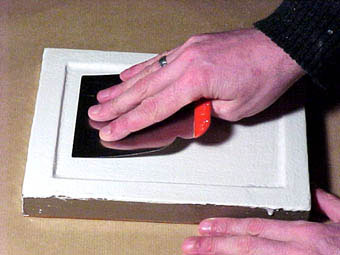
The levkas cools and thickens very quickly and so it should be applied when it is very hot with a large brush in quick passages. The layer should be eve and as fine as possible to reduce the risk of cracks.
If you are coating several boards at a time, be sure to heat the levkas up over and over and to keep stirring it as the glue is heavier than the chalk and tends to drop to the bottom of the container.
Let it dry overnight.
|
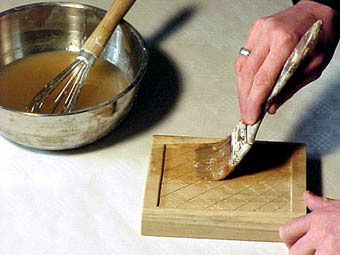
To give equal coverage over the entire board surface, apply the first of the four layer of levkas by applying the brush strokes in a crisscross manner. Work out any small bubbles that appear in this first layer. In the successive layer apply the mixture firmly with a spatula or putty knife .
Be sure to cover the container of levkas with plastic wrap to present evaporation as it cools.
To insure that the strength of the glue is not diminished during the application of these layers, be sure to add a tablespoon or more of water each time the levkas is reheated. If it is not done the levkas may crack.
|
Sandpapering
|
|
 |
After the third layer, and when the levkas is quite dry, sand using a block of wood covered with 80 to 240 sandpaper to eliminate gross irregularities. Sand using regular and circular motions.
Begin with 80 to 120 grit sandpaper, then 240, then 400, and finally use 600 to eliminate the last of the surface lines and to polish the board. The board will feel as smooth as ivory.
Avoid over-sanding or removing too much levkas as the linen will reappear and with any first layer bubbles.
|
|
The double layers of levkas
|
|
The purpose of the double layers of levkas is to slow the drying process. This is accomplished by applying the levkas with a spatula or putty knife. Repeat his process two to three times depending upon the result you wish to obtain. Do not apply additional layer to levkas that has already been finished.
|
 |
- Apply a layer of levkas with a brush
- Allow to dry 5 minutes so that the layer becomes matt
- Put another layer of levkas with the brush
- Make a smooth flat passage with the edge of a spatula. Then, from the edges, make a beveled edge by pulling downwards with the spatula towards the interior surface. Repeat this all along the interior edges turning the board as you make application.
- Run a wet index finger along the bevel to erase all traces of the spatula and to align the angles of the bevel. |
|
The finish layer
|
| Check for any faults, small holes, or spatula lines. Drop small amounts of levkas on any of these areas. These drops are applied directly on to the dry bottom surface and are smoothed out by drawing the spatula across the surface. Or they are smoothed out with the palm of a hand that is slightly humid. If any small bubbles remain, you can also correct them in the same way with a slightly moist palm. |
Fissures and cracks
|
 |
If cracks appear at any time during the application of the layers or when the board is finished, it is best to remove all the levkas from the board, determine if there are major defects (knots, fissures or significant warping). Then if the board is sound, re-apply the layers.
Things will only get worse if additional layers are applied over the cracked surface. And fissures will only become more pronounced.
|
| Remember that an icon board should not have the sense of mechanical perfection of an industrial product. The imperfections of a board harm neither the aesthetics nor the spiritual value of an icon. It is important however that the board not have large faults especially in the area where the face will be. The face, after all, is the center of presence in the icon. Small cracks at certain secondary places can be allowed such as along a bevel or along the frame. |
|
|
Home / Icon technique summary / The preparation of the board
Last update : Tue, Dec 9, 2008, P. Grall © ASA 2000 - 2009 All rights reserved.
|
|