 |
 |
|
|
|
Drawing (see byzantine style)
|
|
A good drawing is essential for a successful icon. As far as possible, take time to study good icons done by the Masters and, do not deviate from the original. Look at numerous models in books with good reproductions. Test your drawing by viewing it in a mirror, live with it by hanging it on a wall where you live and, if it is possible ask for the opinion of an experienced icon painter.
Drawing can be improved and corrected during the drawing process by using tracing paper of China paper and, making drawings over the top of the original drawing. The more often the image is drawn the more it will help you both get a good drawing and to line the finished drawing on the board with a brush
|
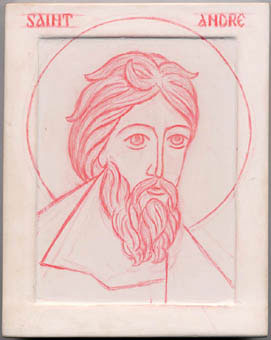 The drawing of saint Andrew
|
After you have a good drawing, cover the back of the drawing paper with red ochre powder, align the drawing properly on the board, tape it down, and transfer the drawing to the board by tracing over the original drawing. Remove the drawing and redraw the image on the board with red lead. Red leads are preferable to graphite because they are not as dirty and the drawing will disappears under the colors. The exception to this is for any drawing that is done under very transparent layers of color.
Don't throw away your drawings because they may be useful as a reference to recover the original lines during the stages of painting.
|
Notice in the drawing of St. Andrew that the negative and positive areas of the board are both well balanced and of a scale that is pleasing to the eye and increases the sense of the presence of the image. Notice also that the halo touches the edge to enhance this sense of presence. Be aware also that the right eye is placed in the center of the board, thereby accentuating the force of the glance toward the viewer.
|
|
Engraving
|
|
Various instruments with hard metal points that are used for engraving can be found in art supply stores. But a pencil with a nail attached will work equally well as illustrated below ...
Be very carefull that you do not engrave too deeply. Lines should be very precise and this may be achieved by pulling the point towards you and by turning the board as you go each time you feel that the precise control of the line is being lost.
Beginners will engrave all of the drawing paying special attention to the lines of the face. The more experienced painters will engrave less and less of the drawing. For them it is sufficient to engrave just the shape of the hands and feet, the lines of the eyes, the mouth and the areas that are to be gilded. After the engraving has been done the remainder of the drawing lines that are not essential may be eraced.
|
|
|
|
Gilding
Gilding is an art in itself and control over the various techniques of gilding may be achieved only after a many years of practice. Based on observation of old icons, gilding can be classified in two main categories according to its final appearance :
- Gilding that is burnished. Gold that is burinshed has the appearance of a mirror. This technique uses a ground of fine clay (Armenian bole) on which is applied loose gold leaves. The bole chrated a flexible surface that allows for polishing the gold with an agate burnisher. Burnishing gold on bole will leave no scratches or tracts after the work is complete;
- Oil or water gilding which gives a living and warm light to the icon :
- Oil size should be diluted by one-third with rectified benzine. According to the instruction on the bottle, you must wait three to twelve hours for this size to tack up before applying the gold leaf. You can test the surface for the best moment for application of the gold leaf by running your finger on the surface of the size. The surface should be solid, the size should not stick to the finger, and will "grate" you pull your finger over the surface. Application of the gold may begin according to the technique illustrated below.
- The water (Aqua) size : .
|
 |
Basic materials :
- Quick water size looks milky and is sold in fine arts stores;
- Sheets of gold leaf on a backing, Paten Gold, are sold in notebooks of 10 to 25 sheets, 8 x 8cm;
- Synthetic hair brush to spread the size on the surface;
- Gilding mop with a rounded dome to clean the gilded surface.
|
 |
Add 30% water to the size to avoid the mixture from becoming thick giving the appearance of raised areas or brush strokes under the gold.
Determine the area to be gilded, i.e., background and haloes or only haloes.
After carefully cleaning the board, spread out the size over a little area of the surface to be gilded. To not go over the engraving lines.
|
 |
Cut out strips of the Paten gold sheet. After ten minutes drying time, and when the surface has absorbed all the liquid, transfer the gold to the sized area of the board by laying the gold flat on the area and pressing slightly on the backing sheet. Pull the backing sheet away and the gold should adhear to the areas where the size was applied |
 |
Continue the application over the whole area that the gold is to be applied to.
Apply the size mixture to the next area to be gilded until the entire surface is covered.
To join together two areas of gilding, allow the size to overflow slightly over the gold that has been applied and cover it with a new sheet of gold.
|
 |
Allow the finished gilding to dry for one hour and delicately remove the excell gold with a gilding mop.
After cleaning, if there are holes in the gilding they may be repaired by applying a little size and gold over the places to be repaired.
|
 |
All this to dry overnight and then protect the gilding with a layer of bleached shellac.
Use 90o alcohol to dilute shellac and to clean the brushes used for its application.
|
 |
To the mixed shellac, add 50% alcohol and apply it in one passage over the gold in order to avoid thickness.
Clean the brushes and allow them to dry for one hour.
|
 |
Remove any gold barbs with an "exacto" or box knife. |
|
|
Home / Icon technique summary / Drawing engraving gilding
Last update : Fri, Jun 12, 2009, P. Grall © ASA 2000 - 2009 All rights reserved.
|
|
